
A representative soil sample is a small portion of soil that truly reflects the average properties of the entire area being tested. In other words, it should capture the “true characteristics” (physical, chemical, biological) of the whole field or zone. In practice this means combining many subsamples from across the area so that the final sample is like the average soil. As West Virginia University explains, a representative sample “represents the average in your sampled area.”
A simple analogy is helpful: you wouldn’t judge a whole pot of soup by tasting one unmixed spoonful from the top. First you would stir the soup to mix it, then taste a spoonful. That stirred spoonful represents the whole pot. Soil sampling works the same way: you collect and mix many small cores so that one baggie truly represents the entire field, not just a random spot.
The Critical Importance of a Representative Soil Sample
Soil testing is a cornerstone of modern agriculture and environmental management. Globally, the soil testing market is expected to grow at over 6 % annually through 2030, as farmers and land managers increasingly rely on data-driven decision tools. In India, for example, the National Bureau of Soil Survey & Land Use Planning reports that over 2 million soil samples are analyzed yearly to guide fertilizer prescriptions. In the United States, lab fees and services for soil testing support over 100,000 farm operations annually.

Recent surveys indicate that nearly 40 % of soil test errors trace back to poor sampling technique rather than laboratory error. In one large-scale agronomic study, fields sampled with improved protocols gained on average 12 % higher yield per fertilizer dollar compared to fields sampled poorly. In environmental sectors, analysts estimate that mis-sampling contributes to cleanup cost overruns of up to 20 %.
Getting the sample right is crucial because all management decisions (fertilizer, lime, irrigation, or remediation) will be based on the lab report. If the soil sample is not representative, the test results will be wrong – a classic “garbage in, garbage out” situation. For example, an unrepresentative sample might show a pH or nutrient level that is higher or lower than most of the field actually has. A farmer might then apply too much lime or fertilizer, wasting money and possibly harming the crop. Or worse, real deficiencies could be missed, and yield would suffer.
Similarly, in environmental testing, a poor sample can mislead cleanup efforts. Standard sampling approaches that fail to account for uneven contaminant distribution can underestimate or overestimate pollution, leading to poor decisions. For instance, if only “clean” spots are sampled (or only obvious hot spots), the average contamination level will be wrong. Sampling only at one depth or one location could overlook contamination deeper down or off to the side. The Interstate Technology & Regulatory Council notes that such errors can cause “decision errors,” including unnecessary cleanup costs or missed hazards.
The goal is to get data that you can trust to manage the whole area. With a representative sample, soil test results can guide efficient, cost-effective decisions – applying fertilizer where it’s really needed, or focusing cleanup only where contamination truly exists. In agriculture, this means maximizing yield while minimizing waste and environmental impact. In sum, a truly representative sample underpins reliable soil fertility and remediation plans for the entire field.
Pre-Sampling Plan For Representative Soil Sample: Laying the Groundwork
In recent decades, precision agriculture has pushed sampling unit sizes smaller, with some farms using zones as small as 1 acre or less. Satellite imagery and drone-based sensors now help farmers define zones by detecting soil moisture or crop stress variations at high resolution (2–5 m). Studies show yield variability within a single 20-acre field can exceed 30%, underscoring the need to subdivide zones wisely.
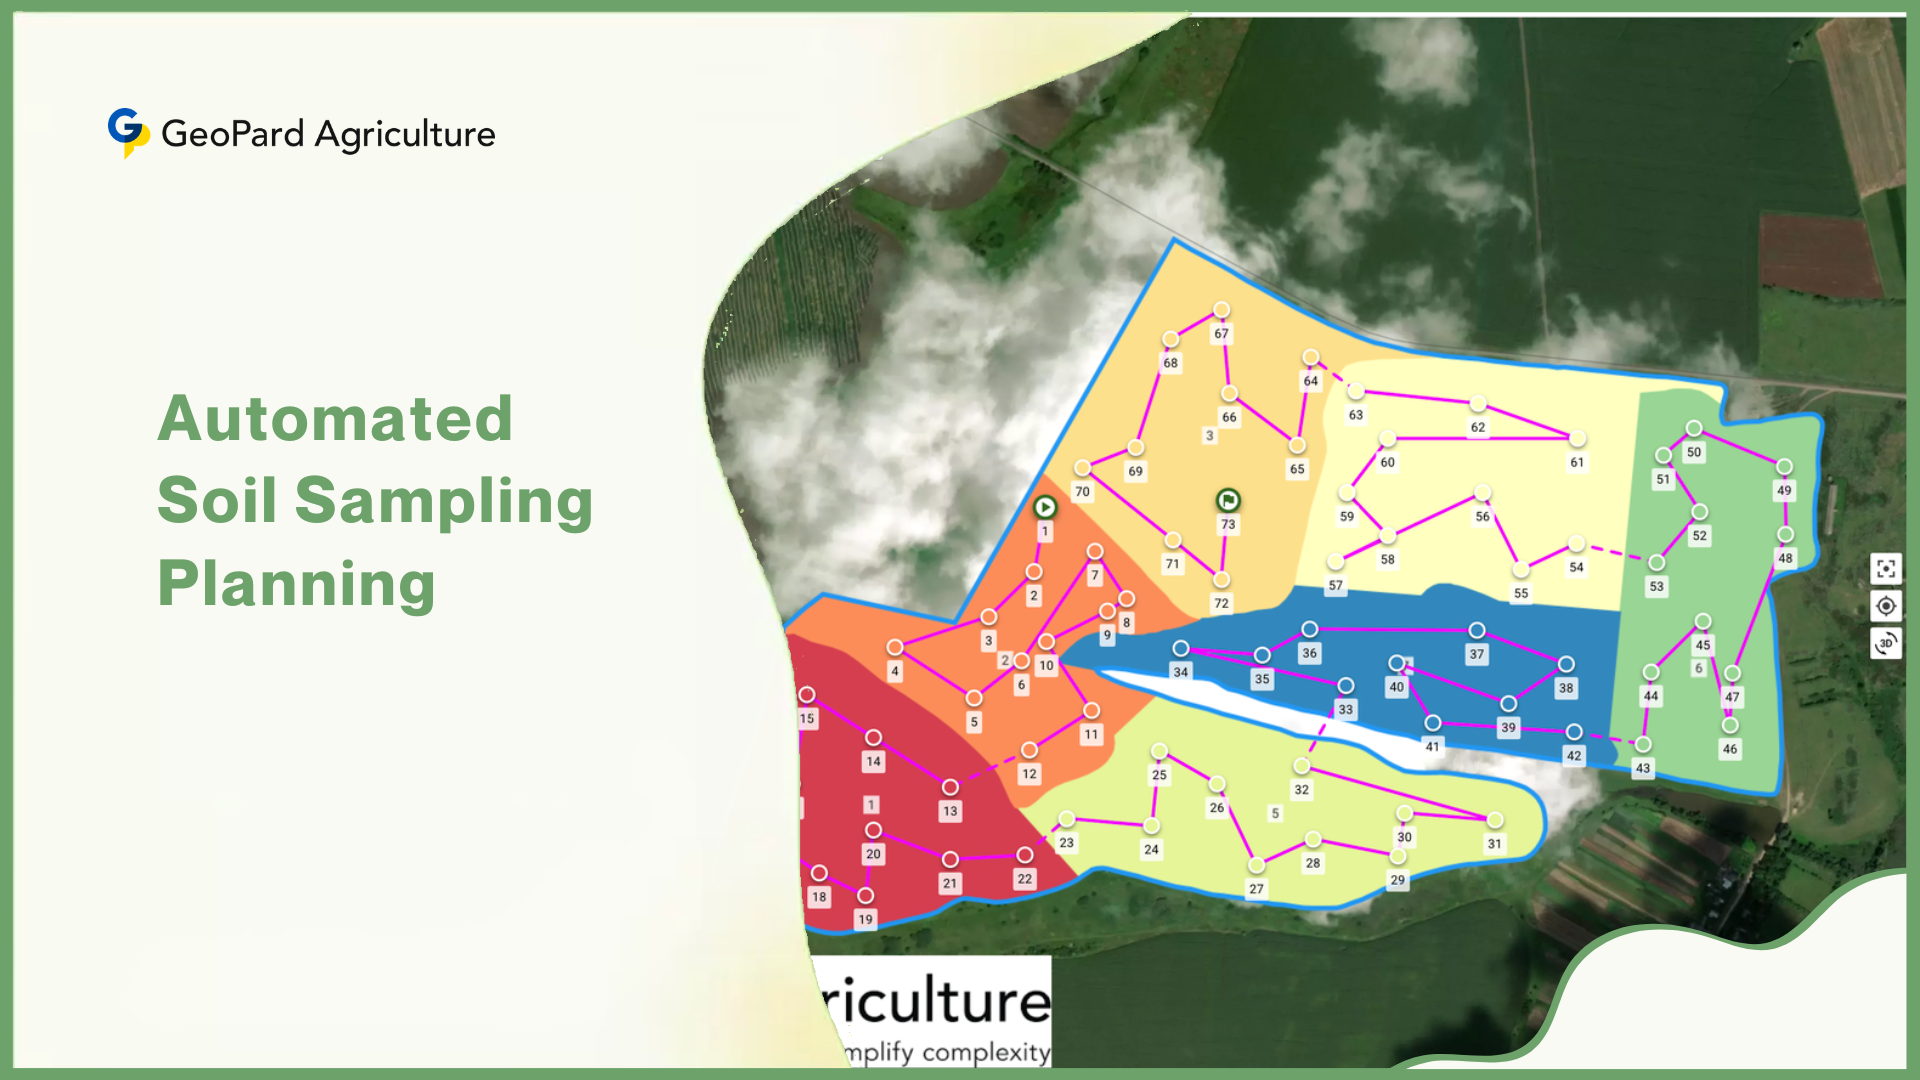
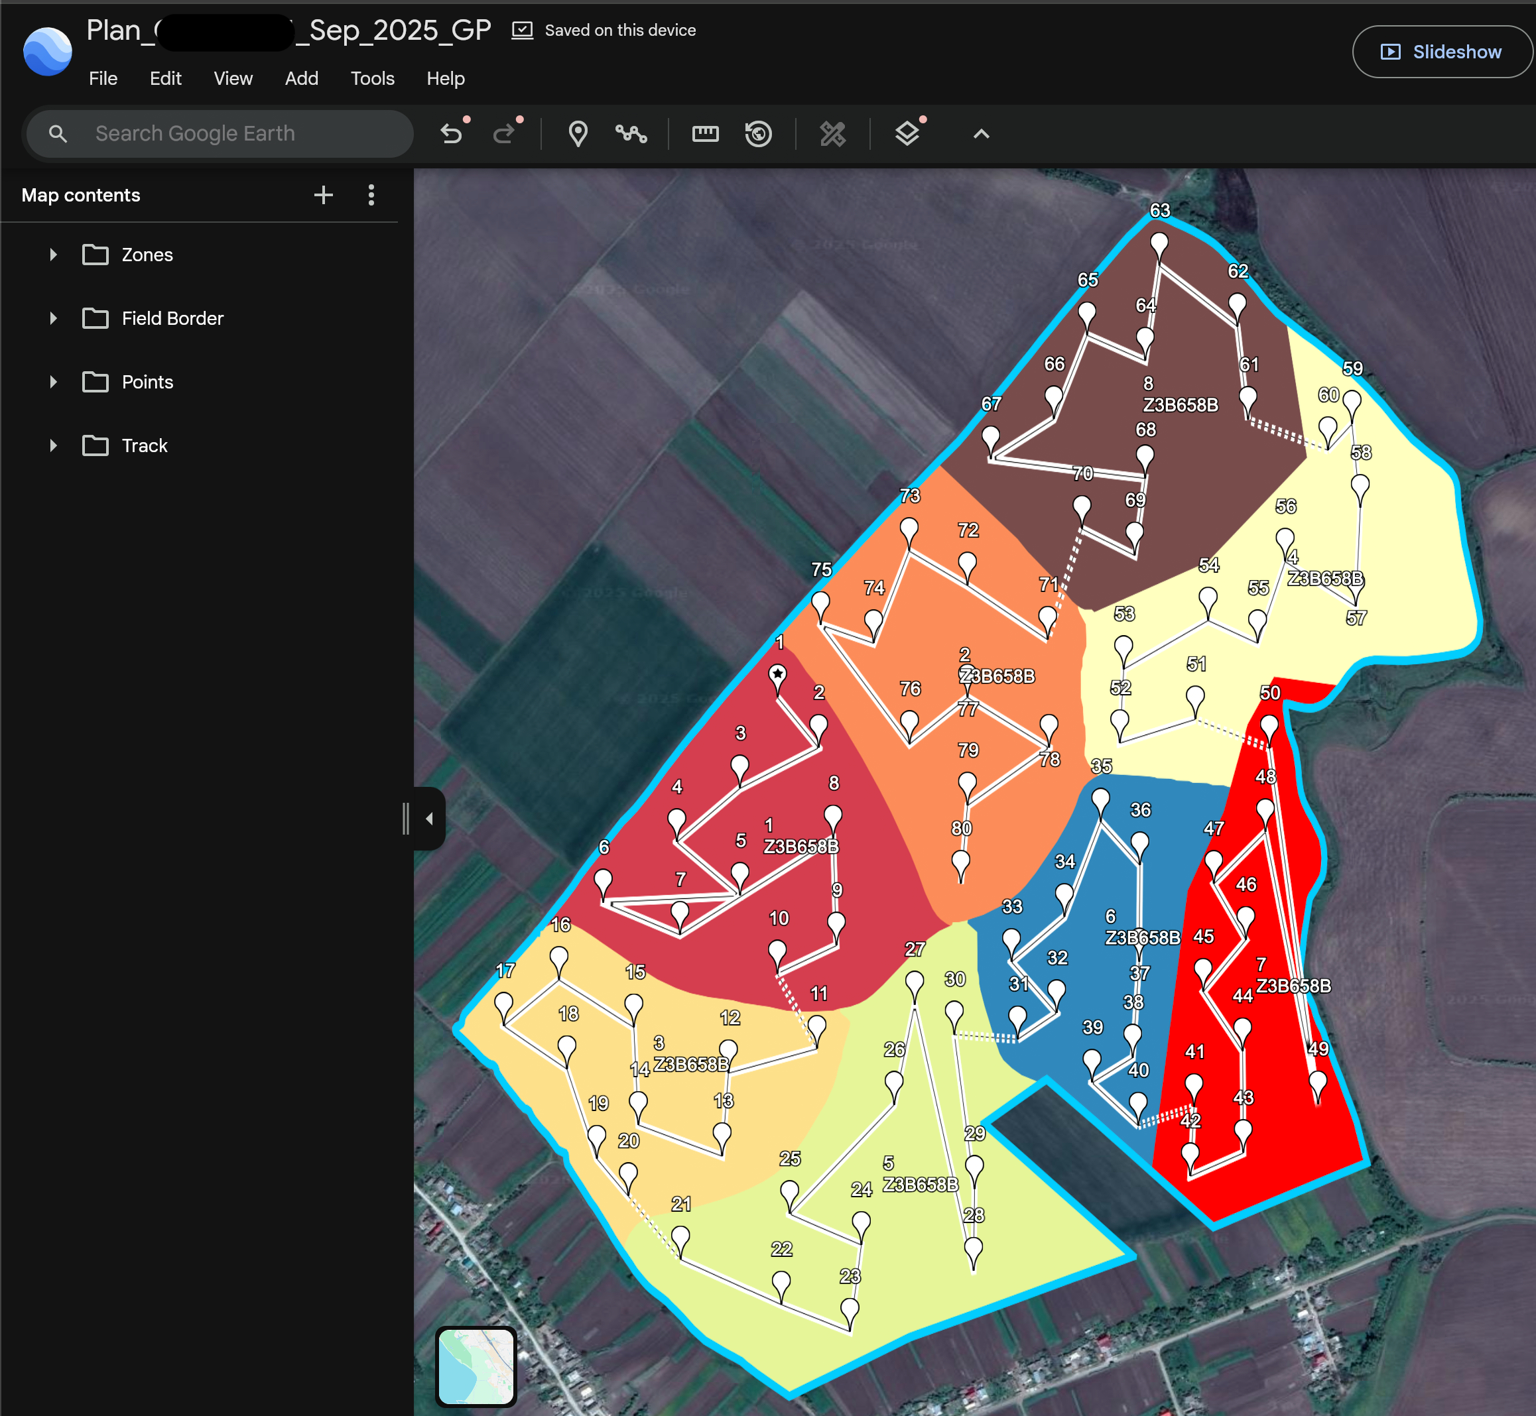
Before taking a Representative Soil Sample., plan how you will sample. The first task is to define your sampling units – the areas for which each composite sample will represent. For a very large field, it may make sense to split it into several management zones or uniform areas. Each zone should have roughly uniform soil and management history. For example, one zone might be an area that has had manure spread on it in the past; another might have a different soil type or slope. By sampling each zone separately, each soil sample truly reflects its own area.
Factors for dividing zones include:
- Past management history: Has part of the field been amended, fertilized heavily, or used for livestock or compost? (e.g. old manure piles, barnyard/feeding areas). Such areas often have higher nutrients, so they should be sampled separately.
- Soil type or texture: Look at a soil survey map or feel the soil. If a field transitions from sandy soil to clay, consider separate zones. Changes in soil color or feel often signal different properties.
- Topography and drainage: Uplands, slopes, and low spots tend to behave differently. For example, nutrients can wash downhill, so a hilltop and valley bottom might need separate samples.
- Crop health or visible differences: Parts of the field that look very different – stunted crops, weeds, wet spots – may indicate different soil conditions and may warrant separate sampling.
Once zones are defined, each zone is sampled and analyzed on its own. This ensures the lab results (and any fertilizer recommendations) apply to that uniform area.
Gather the right tools: Before sampling, assemble your equipment. You will need a soil probe or auger (stainless steel if possible) to extract cores, plus a clean plastic bucket or tray for mixing the samples. (Metal containers are not recommended: they can contaminate samples, especially micronutrient tests.) Other useful items include a small shovel or trowel, clean sampling bags or boxes to hold the final sample, and labels/markers for tagging each bag. Also prepare a field notebook or sampling form to record details like field name, date, and GPS or location notes. Having all tools ready and clean will make the field work go smoothly.
The Field Procedure: A Step-by-Step Guide
Advances in digital mapping now allow farmers to overlay sampling patterns on field maps, increasing uniform coverage. In one trial, using GPS-assisted zig-zag patterns reduced sample variance by nearly 25 % compared to purely random walking. In some precision farms, mobile apps guide the sampler to predetermined waypoints for consistent coverage for Representative Soil Sample.
1. Collecting Sub-samples: Within each defined zone, collect multiple soil cores (sub-samples). Most agronomists recommend at least 15–20 cores per composite sample. This large number helps capture the natural variability of the soil. Walk through the zone in a zig-zag or grid pattern, taking one core at regular intervals across the entire area. (Vary your path so the cores cover the whole field.) Avoid taking samples from very odd spots – for example, skip fence rows, irrigation ditches, old burn piles, or any small patch that is not typical. Each time, push the probe or auger vertically into the ground to the proper depth (see below), then pull out the soil core and drop it into your bucket. Repeat until you have all 15–20 cores for that zone.

2. Consistent Sampling Depth: Be sure all cores for a given sample come from the same depth. For most croplands, this means sampling to the full tillage depth, typically 6–8 inches (about 15–20 cm). (When in doubt, sample the same depth that plows or tillers reach.) For pastures, lawns, or turf, a shallower depth of roughly 3–4 inches (8–10 cm) is standard. In no-till fields, sampling often goes to 6 inches or is split into 0–2″ and 2–6″ increments. Whatever depth you choose, be consistent – all cores for that sample must be taken equally deep. If you mix shallower and deeper cores, the nutrient readings will be diluted or skewed and won’t reflect reality.
3. Creating the Composite Sample: Pour all the cores from one zone into the clean bucket. Thoroughly mix the soil together, breaking up any clumps by hand or with a trowel. The goal is a uniform, homogenous mix. Once mixed, the bucket’s contents are a composite of the zone. However, the lab only needs a few pounds of soil, so you must reduce the bulk. A common method is quartering: spread the mixed soil out on a clean sheet or tray, divide it into four equal parts. Discard two opposite quarters and leave the other two. Then remix the remaining soil and, if still too much, repeat the process. Quartering ensures the final subsample is still representative. When done, take about 1–2 pounds (0.5–1 kg) of soil from the mix and place it in your sample bag or box. That portion is your final composite sample for the lab.
4. Proper Labeling and Documentation: Immediately label the sample container with critical details. At minimum, write the Sample ID, date, field or farm name, and the soil depth. Note any other info on the label or a form: for example the intended crop and any identifiers (e.g. “Zone A – Cornfield, 0–6″”). Also keep a record (notebook or chain-of-custody form) of who collected the sample, from exactly where, and how it was handled. Good records prevent confusion later. Accurate labeling is crucial – a mix-up can invalidate the sample.
Post-Collection: Handling and Submission of Representative Soil Sample
Recent lab audits report that about 15 % of submitted soil samples suffer from poor handling (e.g. contamination, overheating, mislabeling), which reduces confidence in test results. In international lab networks, shipping delays longer than 7 days increase nitrogen test errors by 10–20 %. Accelerated courier services and cold-pack shipping have become more popular to preserve sample integrity.
Once the Representative Soil Sample is collected and bagged, handle it carefully to preserve quality. Keep samples cool and out of direct sun until they reach the lab. Do not leave them baking in a hot vehicle. Do not use metal containers for shipping – even the inside of metal buckets can leach iron or other metals into the soil. If needed, store samples in a refrigerator or cooler, especially if it’s very hot outside. If you must delay sending the sample, you can air-dry most samples at room temperature – spread the soil in a thin layer on paper and let it dry. (Breaking clumps as it dries is okay.) However, if the lab will test for nitrate-nitrogen (NO₃-N), ammonium, or soil microbes, do not air-dry those samples, as drying will alter these measurements. In those cases, ship the sample moist and cool as soon as possible.
When submitting the sample to a lab, fill out their submission form completely. Include all relevant field and crop history – what crops were grown, what fertilizers or manures have been applied recently, and what you plan to grow. This context helps the lab interpret results. Also choose the appropriate tests. A standard soil test typically measures pH, buffer pH, organic matter, cation exchange capacity, phosphorus (P), potassium (K), calcium (Ca), magnesium (Mg), and sometimes micronutrients. If you have specific concerns (e.g. heavy metals, salinity, or soil biology), be sure to request those analyses. In short, provide the lab with as much information as they need to analyze the sample properly and make useful recommendations.
Special Considerations and Variations
In recent research, soil health indicators such as active carbon and microbial biomass are gaining attention. Over 60 % of advanced agronomic programs now include at least one biological test during soil sampling. Environmental regulators in many countries now mandate hotspot mapping with at least 5 discrete samples per 100 m² in suspected contaminated zones.
1. Agricultural Fertility Sampling: For typical crop fields, focus on the root zone (top 6–8 inches) and use management zones as discussed. Each zone’s composite sample reflects its specific soil conditions. If historic fertilizer bands are present, or if precision zones (from yield maps) exist, use those in planning samples.
2. Environmental Contamination: When testing for pollutants, sometimes the goal is to find “hot spots.” In those cases, simple random composites may miss a tiny patch of contamination. Investigators often use a systematic grid or directed sampling in addition to composites. For example, they might overlay a grid on the site and sample each grid cell, or take many small “grab” samples around suspected areas. This strategy sacrifices representativeness for thorough detection. (For formal cleanup work, strict chain-of-custody and discrete samples may be required.)
3. Soil Health/Biological Sampling: If assessing soil biology (microbial activity, earthworms, etc.), handle the sample extra carefully. These tests require living organisms, so samples must be kept cold and processed fast. Do not dry these samples – keep them sealed in a cool box and ship overnight if possible. Even the act of mixing and sampling should be done gently to avoid stressing microbes.
4. Layered (Profile) Sampling: In forests or detailed research, soil often is sampled by depth horizons. For example, take separate cores for 0–15 cm, 15–30 cm, 30–60 cm, etc., and label each depth layer. These layers are then analyzed separately. (A similar idea is splitting for no-till vs. tilled fields.) This approach helps understand how nutrients or contaminants vary with depth.
Common Mistakes to Avoid
Across many extension programs, a survey found that 70 % of farmers make at least one common sampling error (too few cores, poor labeling, or mixing zones). In a recent training program, reducing these errors improved test consistency by 20 %. Therefore, emphasizing best practice in sampling is not just theoretical—it makes lab results more dependable.
- Too few subsamples: Collecting only a handful of cores (e.g. 3–5) is usually insufficient in a typical field. Experts recommend at least 15 per composite. Too few cores means you may have accidentally sampled a lucky or unlucky spot, and the result won’t reflect the whole area.
- Sampling only a small or unusual spot: Some people take one or two samples near a convenient corner, gate, or road. This is not representative. A tiny localized area (even if it looks like the rest) can mislead you. Also avoid very strange spots: old fence rows, near manure piles, feedlots or burnt areas should be skipped or sampled separately.
- Mixing different management zones: Don’t combine soil from different fields or zones into one sample. For example, do not dump soil from both a fertilized corner and an unfertilized corner into the same bucket – their nutrients can cancel out and hide real problems. Each distinct area should have its own composite. (As a rule, one composite sample should represent no more than about 10 acres unless the area is very uniform.)
- Using dirty or metal tools: A rusty or oily probe, or a metal bucket, can contaminate the sample. Iron or other metals can artificially raise readings of certain nutrients (like zinc or copper). Always use clean tools and plastic containers.
- Poor labeling or record-keeping: Failing to label the bags immediately or forgetting to note which field the sample came from can ruin everything. If a lab receives unmarked soil, there’s no way to know what fields the results belong to. Always label on-site and double-check your notes.
By avoiding these mistakes and following a careful protocol, you ensure the soil test results are meaningful. A lot of effort goes into taking a representative soil sample – but it pays off by giving you confidence in the data.
Conclusion
A representative soil sample is the foundation of any good soil test. By planning zones, collecting many cores, mixing thoroughly, and handling samples properly, you help guarantee that lab results truly reflect your land. This attention to detail makes soil testing worth the effort. In the U.S. alone, farmers and consultants analyzed roughly 10 million soil samples in 2020, and they rely on each one to make decisions about fertilizer, lime, and amendments. With so many tests each year, the quality of those tests rests entirely on the samples collected.
When samples are truly representative, the payoff is smarter, more cost-effective management – higher yields where needed and fewer wasted inputs where not. It’s an investment: the work you put into taking a proper sample will return manyfold in the reliability of your fertilization plan or cleanup effort. In short, remember that good sampling is the first step to good soil management.


 NDMI calculated on top of Planet / Sentinel-2 / Landsat image

